How Is A Squeegee Used In The Silkscreen Process
Ronan Farrow
Apr 04, 2025 · 3 min read

Table of Contents
How a Squeegee is Used in the Silkscreen Process
Silkscreen printing, also known as screen printing, is a versatile method for applying ink to various surfaces. A key tool in this process is the squeegee, and understanding its proper use is crucial for achieving high-quality prints. This guide will walk you through the essential techniques of using a squeegee in silkscreen printing.
Understanding the Squeegee's Role
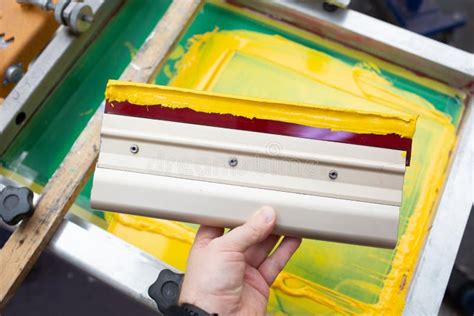
The squeegee's primary function is to force ink through the open areas of a screen stencil onto the substrate (the material being printed on). The blade's even pressure and controlled movement dictate the ink's transfer, directly impacting the print's quality, consistency, and sharpness. Choosing the right squeegee, with its appropriate blade durometer (hardness) and angle, is critical for different inks and substrates.
Key Squeegee Components:
- Blade: This is the crucial part that pushes the ink. Different materials (rubber, polyurethane) and durometres exist, each suited for specific inks and printing techniques. A harder blade is usually better for thick inks, while a softer blade works well with thinner inks and delicate substrates.
- Handle: The handle's length and grip influence control and pressure application. A longer handle provides more leverage, particularly for large-format prints. Ergonomics are essential for reducing hand fatigue during longer printing sessions.
The Silkscreen Printing Process: A Step-by-Step Guide with Squeegee Usage
This detailed breakdown will explain the techniques needed for successful squeegee usage:
1. Preparation is Key
- Screen Setup: Ensure your screen is securely positioned and the stencil is properly aligned on your substrate. This is crucial for precise and consistent prints. Any misalignment here will be replicated in your final print.
- Ink Preparation: Mixing and thinning the ink appropriately is essential. The ink's viscosity directly affects the squeegee's action. Too thick, and the ink won't flow easily; too thin, and you risk bleeding or poor definition.
- Substrate Preparation: Make sure your printing surface (T-shirt, poster board, etc.) is clean, dry, and securely held in place to prevent movement during the printing process.
2. Applying the Ink
- Ink Application: Use a scoop coater or similar tool to apply a thin, even layer of ink across the screen's stencil opening. This ensures consistent ink coverage across your print area.
- Squeegee Placement: Position the squeegee at the starting edge of the print area at a consistent angle (usually around 45 degrees, but this can vary depending on the print).
3. The Squeegee Stroke
- Pressure and Speed: Apply firm, even pressure to the squeegee. Too little pressure, and the ink won't transfer properly; too much, and you could damage the screen or substrate. Maintaining a consistent speed throughout the stroke is essential for a uniform print.
- The Stroke: Pull the squeegee across the screen in a smooth, controlled motion. Avoid jerky movements that could lead to inconsistent ink distribution or create streaks.
- Off-Contact Printing: After the squeegee stroke, gently lift the squeegee from the screen, preventing smearing or unwanted ink transfer. A slight off-contact, maintaining a little space between the blade and the screen, is desirable.
4. Print Evaluation and Refinement
- Consistency Check: Once you've made a few test prints, assess their consistency. Are they uniform in ink density? Are there any streaks or other flaws? Adjust your pressure, speed, or ink consistency as needed.
- Troubleshooting: If you encounter issues like uneven ink coverage, bleeding, or pinholes, analyze each step in the process to identify and correct the cause.
Choosing the Right Squeegee
The optimal squeegee will depend on several factors:
- Ink Viscosity: Thicker inks need harder squeegees; thinner inks work better with softer ones.
- Screen Mesh: The mesh count of your screen impacts the squeegee's required flexibility and pressure.
- Print Area: Larger prints might benefit from a longer squeegee handle.
- Substrate Type: Delicate substrates may require a softer squeegee to avoid damaging the surface.
Mastering the squeegee technique requires practice, patience, and attention to detail. By understanding the principles outlined above, you can significantly improve the quality and consistency of your silkscreen prints.
Featured Posts
Also read the following articles
| Article Title | Date |
|---|---|
| How Do Horses Move Their Tails | Apr 04, 2025 |
| How Do You Wash Miracle Sheets | Apr 04, 2025 |
| How Did Jesus Handle Narcissists | Apr 04, 2025 |
| How Early To Book Wedding Venue | Apr 04, 2025 |
| How Far Away Can Deer Smell Doe Urine | Apr 04, 2025 |
Latest Posts
-
How Long Can Ich Live Without Fish
Apr 05, 2025
-
How Long Can I Use A Straw After Tooth Extraction
Apr 05, 2025
-
How Long Can I Run My Gas Fireplace
Apr 05, 2025
-
How Long Can I Let Brisket Rest In Cooler
Apr 05, 2025
-
How Long Can I Leave My Gas Fireplace On
Apr 05, 2025
Thank you for visiting our website which covers about How Is A Squeegee Used In The Silkscreen Process . We hope the information provided has been useful to you. Feel free to contact us if you have any questions or need further assistance. See you next time and don't miss to bookmark.
